
Imagine that you are one of your users
It’s around 11PM, you are tired and did not read your email for the last two hours.
You try and access your companies financial system to put the latest report you created in there. However, you are presented with an error. Frustrated, you call the on-call engineer to ask them to fix the service, who was enjoying some quality time up until your call. The engineer, slightly annoyed, tells you that the service is undergoing maintenance and that you were informed about this via your email.
Back to being an engineer
This small interaction can already be costly if the on-call engineer is an external pay-per-use service, and your user lost extra time. This could be prevented with a simple maintenance page on top of your email.
The maintenance page is easy to set up, and helps to save the sanity of the user and with that; your precious quality time.
Prerequisites
- Enabling Responder feature
- HTML Page (I made a simple one available for you below)
How does it work?
To have a maintenance page, we need a fake virtual server that is ‘always on’. Here, we will bind a Responder Policy that will trigger the maintenance page. We can tell any real server to use this ‘always on’ server as the backup virtual server in case it goes down.
Enabling Responder feature
This is only required if a yellow exclamation mark is next to the Responder tab under AppExpert. If no exclamation mark is present, you can continue to the Uploading the HTML File chapter.

To enable the Responder feature, login to the ADC and go to:
Configuration -> System -> Settings -> Configure Advanced Features

Then select the ‘Responder’ checkbox and press OK.

If all went well, the exclamation mark is now gone.
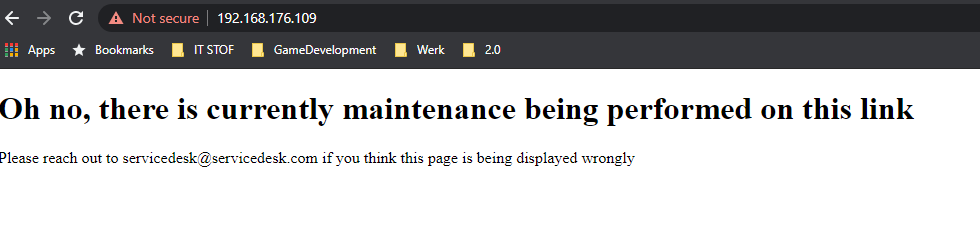
Uploading the HTML File
As you probably figured, the maintenance page will just be a HTML file being displayed.
To do that, the first logical step would be to upload our HTML file to the Citrix ADC.
If not already done, login to your ADC (GUI).
Go to Configuration -> AppExpert -> Responder -> HTML Page Imports

Then proceed to import from file and select your HTML file.

Press ‘Continue’ and on the page that follows, press ‘done’.
Your file is now uploaded to the ADC.
Create Responder Policy
First we will add the Responder Policy and after that we will proceed with the Responder Action. The action is what triggers when the policy is met. Under the same tab we were already working in, proceed to ‘Policies’ under the Responder tab.

Press Add on the Responder Policies page.

The ‘Create Responder Policy’ page opens, and we will set up both the policy and the action here.
1.First, enter the name and keep in mind that the expression differs on your ADC.
2.The expression specified here is to make sure this policy can only trigger if the header URL is the same as the URL in the expression. If you want this to always trigger, simply set the expression to ‘TRUE‘.
3.When your expression and name are set up, press ‘Add’ on the Action tab.

The ‘Create Responder Action’ page will open.
Keep in mind to change the ‘Type’ to ‘Respond with HTML Page’ and then change the ‘HTML Page’ to your previously uploaded page.
When this is done, you can press ‘Create’ on ‘Create Responder Action page’ and then press ‘Create’ on the ‘Create Responder Policy page’.

When everything is created, you should see your freshly baked Responder Policy in the ‘Policies’ tab:

Creating a ‘Always UP’ Load Balancing Virtual Server
With the responder policy done, we need to make sure it can always trigger on a ‘always on’ virtual server.
This will be a virtual server with no IP and a broken monitor so that the ADC will always report it as ‘online’.
Go to Configuration -> Traffic Management -> Virtual Servers -> Add

Give your Virtual Server a name and set the protocol to SSL or HTTP depending on your security needs, the only difference is you can bind a certificate later on with SSL.
The IP Address can be ‘non-addressable’.
Press ‘OK’ when ready.

Click on ‘No Load Balancing Virtual Server Service binding’ to add one.

Click ‘Add’ (1)

1.Give it a name
2.Make it a new Server
3. Give it a fake IP
4. Set protocol
5. Press OK

- Click the pen icon on the ‘basic settings’ in the Service Window.

- Press on ‘more’ to reveal the ‘Health Monitor’ setting.
- Uncheck the ‘Health Monitor’ setting.
- Press Continue at the bottom of the basic settings, it will now close.
- Review that your server state is ‘UP’.
- Press ‘Done’ at the bottom of the ‘Load Balancing Service’ screen.
- Press ‘Bind’ on the Service binding screen that follows.


On the load balancing virtual server, the state should now also be ‘UP’.
If it’s still down, and you used SSL, please keep in mind that it will stay that way until you bind a certificate.

Binding Policy to ‘Always UP’ server
Almost there, we need to bind the Response policy we created to the always up server.
1. In the ‘Load Balancing Virtual Server’ screen of the LB_AlwaysOnServer click on the ‘+ Policies’ button.
This will add the policy option to the configuration settings.
Scroll down until you see the ‘Policies’.

1.Click on the ‘+’ button

1. Set the Policy to ‘Responder’
2.Set the type to ‘Request’ and press ‘continue’.

1. Click on ‘Click to Select’ (make sure to not click on ‘Add’ as this will create a new policy).
2. In the window that opens, select the policy we made earlier on and press ‘Select’.
3. After that the window closes, press on ‘Bind’.
Your ‘Always On’ virtual server is now fully configured.


Redirecting a server in case of maintenance (or outage)
This bit is going to be different for everybody, but I made a generic virtual server.
Imagine that we want this server to redirect us to our ‘Always on Virtual Server’ when it’s down, so the maintenance page is shown.
1. On the right side click on ‘+ Protection’.
2.Scroll down to the Protection tab that is now added

- If you are unable to edit it, press the Pen icon on the top right of the tab.
- Set the ‘Backup Virtual Server’ to your LB_AlwaysOnServer

Finished
All done! When your production server is down, it will redirect the user to the LB_AlwaysOnServer which will trigger the responder policy. The responder policy presents the user with the maintenance page.
Keep in mind that if your page is not triggering, you might need to set ‘Expression’ we made here to ‘TRUE’

Did something go wrong, or do you need some help? Do reach out in the comments!
0 Comments on Creating a maintenance page on your ADC